ASP.NET Core like Console Application
Getting a Console Application to work by using Hosted Services might sound hard, but it really isn't!

I'm currently trying out Azure Container Apps, and what better way to do that than to run Console based applications on it as well!
A normal console application is not really container ready. This is because we want to have control over the life-cycle of the application itself. For example, when a container application crashes, the pod will crash and that might result into unexpected behaviour. To make sure that the application exits correctly we can use Hosted Services lifecycle management, which makes sure that the application, or the running loops, stop correctly before exiting the application.
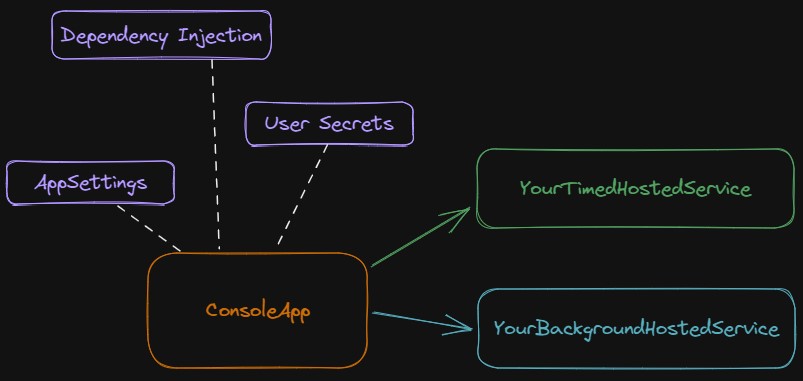
Personally, I would also like to use a lot of the awesome default stuff ASP.NET Core provides us, such as:
- Configuration management via appsettings.
- The ability to manage and use User Secrets.
- Dependency Injection.
The only downside is that we have to use so called Hosted Services that contain all of our logic. We no longer put everything in the main method, as good programmers do, but we split code into different parts. But how? Well, lets get to it!
To get a basic Console App working (.NET 7) we don't need much. First we need to install 2 dependencies:
- Microsoft.Extensions.DependencyInjection
- Microsoft.Extensions.Hosting
Or if you want to change the .csproj yourself:
<ItemGroup>
    <PackageReference Include="Microsoft.Extensions.DependencyInjection" Version="7.0.0" />
    <PackageReference Include="Microsoft.Extensions.Hosting" Version="7.0.0" />
</ItemGroup>
After that we can use the following for a basic Console App:
using System.Text;
using Microsoft.Extensions.DependencyInjection;
using Microsoft.Extensions.Hosting;

public class Program
{
    public static void Main(string[] args)
    {
        // Not needed but sometimes handy, Forcing UTF8
        Console.OutputEncoding = Encoding.UTF8;

        // Use application builder to configure the console app
        var builder = Host.CreateApplicationBuilder(args);

        // Configure DI
        //builder.Services.AddSingleton<YourClass>();

        // Run the main logic inside a hosted service
        // This will make sure it will be properly started and stopped
        builder.Services.AddHostedService<YourHostedService>();

        var app = builder.Build();
        app.Run();
    }
}
That's it! As simple as this.
Now we can add additional stuff to it as we do with normal ASP.NET Core Applications. Things like Dependency Injection or Secret management. And even other Azure Components!
But to loop back, to add a main loop or main logic we have to create a Hosted Service. Various of these background Hosted Services can be made. The following 2 are the most default or the most common ones I can think of. Perhaps I will add more or show additional ones at a later stage.
- A Timer or Timed Hosted Service (trigger based)
- A continues loop Hosted Service (Continues loop)
Timer or Timed Hosted Service
This type of Hosted Service will trigger based on a time interval from the Timer class. Every 10 seconds the DoWork method will trigger and this should contain the work that you will need to get done.
The timer is started when the Hosted Service starts (StartAsync), will be disabled when the Hosted Service requests a stop (StopAsync) and will later be disposed when the service containers feels like it.
public class YourTimedHostedService : IHostedService, IDisposable
{
    private readonly ILogger<YourTimedHostedService> _logger;
    private int _numberOfExecutions = 0;
    private Timer? _timer;

    public YourTimedHostedService(ILogger<YourTimedHostedService> logger)
    {
        _logger = logger;
    }

    public Task StartAsync(CancellationToken stoppingToken)
    {
        _logger.LogInformation("Your Timed Hosted Service is starting");

        // Trigger when created, and every 10 seconds
        _timer = new Timer(DoWork, null, TimeSpan.Zero, TimeSpan.FromMilliseconds(10_000));

        return Task.CompletedTask;
    }

    public Task StopAsync(CancellationToken stoppingToken)
    {
        _logger.LogInformation("Your Timed Hosted Service is stopping.");

        _timer?.Change(Timeout.Infinite, 0);

        return Task.CompletedTask;
    }

    private async void DoWork(object? state)
    {
        _numberOfExecutions++;

        _logger.LogInformation("Your Timed Hosted Service is working. Number of Executions:
            {executions}", _numberOfExecutions);

        // Your actual work, simulates 5 seconds of "work"
        await Task.Delay(5_000);
    }

    public void Dispose()
    {
        // this should implement a proper dispose, bit too much code for an example ;)
        // https://learn.microsoft.com/en-us/dotnet/fundamentals/code-analysis/quality-rules/ca1816
        _timer?.Dispose();
    }
}
In the Main method we should also define the Hosted Service as well, using the following statement:
builder.Services.AddHostedService<YourTimedHostedService>();You are done! Press run and watch the magic!
Background Hosted Service
The following example is sort-of basic, but works when you are injecting singletons. To do a proper implementation with the proper scoping, you should inject the IServiceProvider and create a scope where your main background logic should run. For now, we just skip that and I might return to it at a later stage ;).
public sealed class YourBackgroundHostedService : BackgroundService
{
    private readonly ILogger _logger;
    private int _numberOfExecutions = 0;

    public YourBackgroundHostedService(ILogger<YourBackgroundHostedService> logger)
    {
        _logger = logger;
    }

    protected override async Task ExecuteAsync(CancellationToken stoppingToken)
    {
        _logger.LogInformation("Started the background Hosted Service");

        while (!stoppingToken.IsCancellationRequested)
        {
            _numberOfExecutions++;

            // Your actual work, simulates 10 seconds of "work"
            _logger.LogInformation("Your Background Hosted Service is working. Number of Executions:
                {executions}", _numberOfExecutions);

            await Task.Delay(TimeSpan.FromMilliseconds(10_000), stoppingToken);
        }

        _logger.LogInformation("Stopping the background Hosted Service");
    }
}
And again, in the Main method we should also define the Hosted Service as well, using the following statement:
builder.Services.AddHostedService<YourBackgroundHostedService>();Hope this helps!