I've been using a Ubiqiti setup for quite a while and it's working very nice! At some point in time I'll blog about the current setup and the used parts, but for now, I currently have a fiber connection.
Throughout the years I switched and added a few components:
- Changed my Mikrotek RB2011UAS to a USG, together with a switch and an AP Pro.
- Changed from the USG to the operator provided Fiber Router/Modem.
- Wanted to do things properly again and switched back from the Fiber Router/Modem to the USG setup with a media convertor.
- Added another switch and AP for different parts of the house.
- Upgraded the USG to a UDM to support better throughput after a connection upgrade!
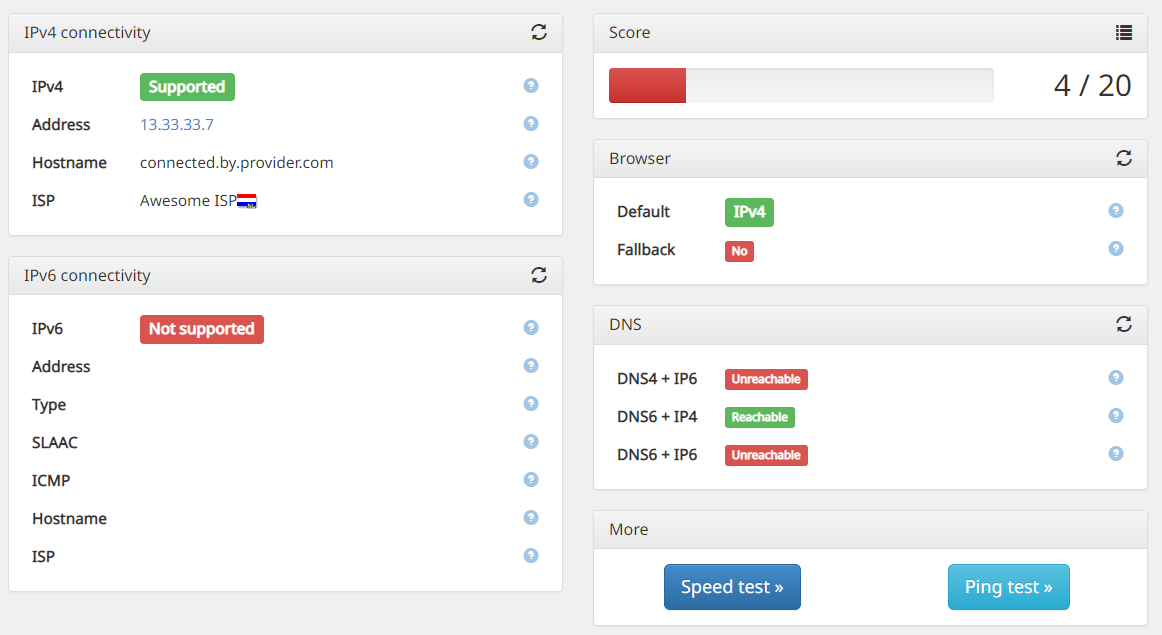
My fiber-life only started a few years back in 2019. Getting things setup was pretty easy and I wanted to get IPv6 working with the USG. Since, with IPv6 being a thing and all, I worried that my current setup didn't properly support it. When navigating to (for example) https://ipv6-test.com/, I was greeted with harsh but eye-opening information :O

At that point I was committed in making the IPv6's working with the USG. However, to get that up and running was a bit of a hassle...
Information on how to get this working in early 2019 was scarce and mainly consisted of various incomplete blog posts about how to fix it. I continued that trend but really wanted to blog about it sooner, but well, we know what happened. Me being the proper gentlemen at this time and blogging about it roughly 4 years to late, will take you back in time, to a more difficult time...
To get things working in 2019 on my USG consisted of 3 very simple steps (I was using XS4ALL (or KPN) or Freedom Internet at the time, they use PD of 48):
- Configure basic settings via the UniFi Controller UI
            Settings -> Networks -> WAN
                IPv4 - Connection Type: PPPoE
                IPv4 - Username: myUserName
                IPv4 - Password: myPassword
                IPv6 - Connection Type: Using DHCPv6
                IPv6 - Prefix Delegation Size: 48
                Common Settings - Use VLAN ID: on, value 6
                Common Settings - QoS Tag: None
                Common Settings - Smart Queues: off

            Settings -> Networks -> LAN -> Configure IPv6 Network
                IPv6 Interface Type: Prefix Delegation
                IPv6 Prefix Delegation Interface: WAN
                IPv6 Prefix ID: empty
                IPv6 RA: On
                IPv6 Prefix Delegation Size: 48 (might differ between providers)
                DHCPv6/RDNSS DNS Control: auto
- Save a "config.gateway.json" in the default sites folder (or whatever the name of your site was) on the host where the UniFi Controller UI software runs
{
    "interfaces": {
        "ethernet": {
            "eth0": {
                "vif": {
                    "6": {
                        "pppoe": {
                            "2": {
                                "mtu": "1500",
                                "name-server": "none",
                                "dhcpv6-pd": {
                                    "no-dns": "''",
                                    "prefix-only": "''"
                                },
                                "ipv6": {
                                    "dup-addr-detect-transmits": "1"
                                }
                            }
                        }
                    }
                }
            }
        }
    },
    "system": {
        "name-server": [
            "1.1.1.1",
            "1.0.0.1",
            "2606:4700:4700::1111",
            "2606:4700:4700::1001"
        ]
    }
}
- Hope for the best
The last step really fixed my problem, since I configured the above, put the config in the proper location and it still didn't work. Even after restarting again and again I was still greeted with the harsh IPv4 only screen.
Until I went to get coffee, ran the test again the next day, and pooof, it worked! I think I just had to wait a bit longer :').
The 2023 way to get IPv6 working on a UDM! (possibly on USG as well)
Somewhere last year I upgraded the USG to a UDM, mainly because of the performance issues with the USG.
Transferring from a USG to the UDM was pretty seamless. Switched the Media Convertor, connected everything and we where good to go! I did not dare to check if IPv6 was working because of the hassle I had with it a few years back. Soooooo, I just procrastinated that like a proper adult! Until a few days back because I was reminded of it while I was closing old tabs. :')
After a bit of googling I was reminded of the tedious process that I had to go through when configuring IPv6 for my USG. Luckily I also found the following UniFi documentation that described a different configuration method than I was used to.
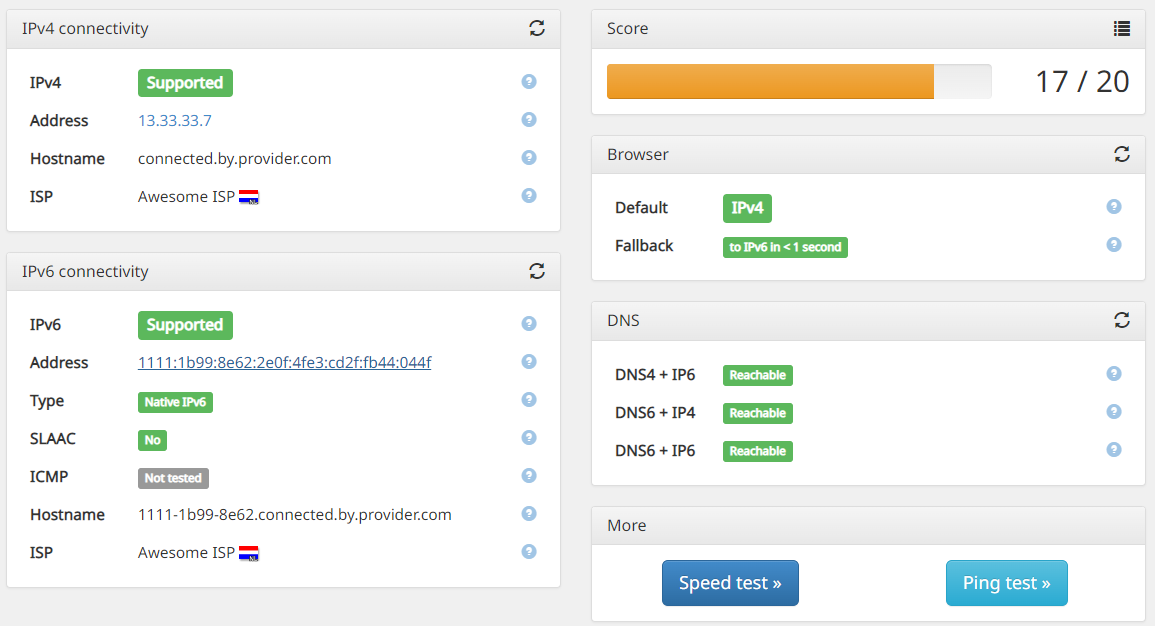
The article basically shows that you can configure IPv6 entirely via the UI at this moment. However, the current UI changed a bit, but roughly following the guide, waited a bit, reran the IPv6 check and voila, it worked!

I was happily surprised by this! Hope you are too!
The only issue now seems to get ICMPv6 working. But that will be a thing to worry about in the future and procrastinate indefinitely!
:3
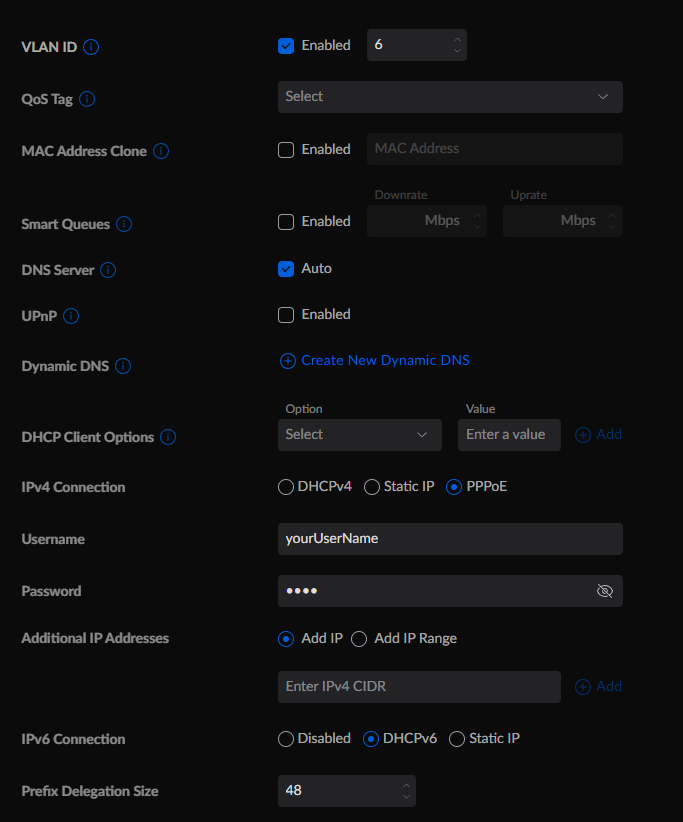
PS: just to make sure, here is a rough walk through for version Network 7.2.95 on a UDM. Since the website might describe a different scenario.
1. Navigate to Settings -> Internet -> Your WAN Network
2. Use Advanced settings
            VLAN ID: On, value 6
            IPv4 Connection: PPPoE
            Username: yourUserName
            Password: yourPassword
            IPv6 Connection: DHCPv6
            Prefix Delegation Size: 48 (or the size your provider requires)

3. Apply changes
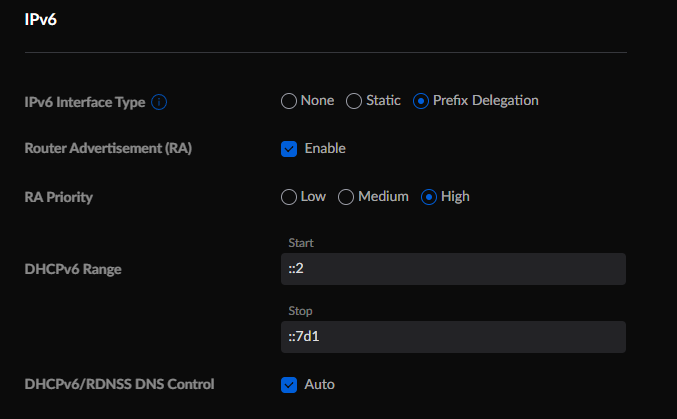
4. Navigate to Settings -> Networks -> Your LAN Network
5. Scroll down to IPv6
            IPv6 Interface Type: Prefix Delegation
            Router Advertisement (RA): Enable
            RA Priority: High
            DHCPv6 Range: Start: ::2
            DHCPv6 Range: Stop: ::7d1
            DHCPv6/RDNSS DNS Control: Auto (or you can enter your custom DNS provider)

6. Apply changes
7. Wait a bit!
8. Profit!
